

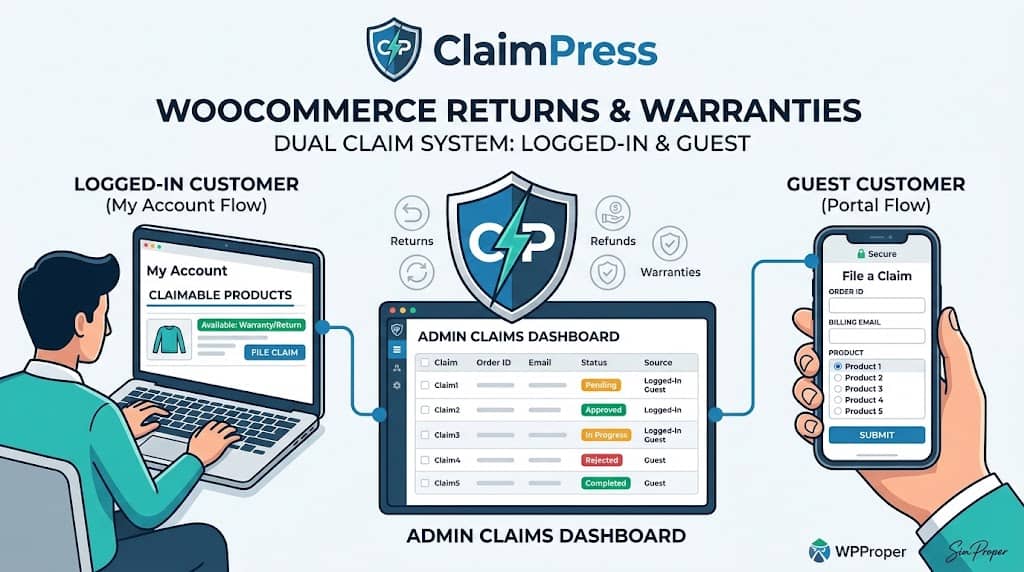
One of the most common points of friction in WooCommerce after-sales processes is the claim submission experience. Logged-in customers can find their orders in My Account — but without a dedicated claims portal, they have nowhere to actually file a warranty, exchange, or return request without emailing support. Guest customers — who checked out without creating an account — have even fewer options, and contacting support by email creates untracked, unstructured requests that fall through the cracks.
ClaimPress solves both sides of this problem with its Dual Claim System: a seamless My Account integration for registered customers and a secure, shortcode-powered guest claim portal for shoppers who checked out as guests. Both flows feed into the same centralized admin dashboard — giving store managers a unified view of all outstanding claims regardless of how they were submitted. This is the core of ClaimPress as a returns and warranty requests for WooCommerce plugin.
The Dual Claim System: Two Submission Paths, One Dashboard
ClaimPress’s architecture treats logged-in and guest customers equally — both can submit warranty, exchange, and return claims, track status, and receive updates. The difference is the authentication mechanism:
👤 Logged-In Customers
Authentication: WordPress account session
Access point: My Account → Claimable Products
Order verification: Automatic — orders tied to their account are shown automatically with eligibility status
👥 Guest Customers
Authentication: Order ID + Email match
Access point: Dedicated guest claim page (your URL)
Order verification: Guest enters Order ID + billing email; system validates the match before showing products
Both submission paths create the same claim post type in WordPress, with the same status taxonomy and the same admin management interface. A claim submitted by a guest and a claim submitted by a logged-in customer are indistinguishable in the dashboard — both show the same information and support the same workflow.
Logged-In Customer Flow: My Account Integration
ClaimPress automatically adds a “Claimable Products” tab to the WooCommerce My Account page for all logged-in users. No shortcode, no page creation, no configuration required — the tab appears automatically when ClaimPress is activated and permalinks are flushed.
The Claimable Products tab shows all orders that contain products with at least one active ClaimPress feature (warranty, exchange, or return) that is still within its eligibility window. For each eligible product, the customer sees:
- Product name and order number: Clear identification of the item and the originating order
- Active policy badges: Which features are available (Warranty / Exchange / Return) and their respective periods
- File Claim button: One-click access to the claim submission form for that specific product
- Existing claim status: If a claim has already been filed for this product, its current status is shown (Pending, In Progress, Approved, Rejected, Completed)
“Claimable Products” Tab: Detailed Features
| Feature | Behavior |
|---|---|
| Eligibility Window Check | Products outside the warranty/exchange/return window are not shown — customers only see what they can actually claim |
| WooCommerce Order Numbers | Displays standard WooCommerce order numbers; supports custom sequential order numbers from plugins (WebToffee, SkyVerge, etc.) |
| Multi-Claim Re-eligibility | When “Allow Multiple Claims” is enabled, products re-appear after a claim is marked Approved, Rejected, or Completed — allowing legitimate follow-up claims |
| Max Claims per Item | Configurable numeric limit on how many times a claim can be filed per order item — prevents abuse while supporting legitimate repeat claims |
| Status Messages | Each claim status shows a unique, accurate message and color (Approved: green, Rejected: red “Closed”, In Progress: blue, Cancelled: grey) |
| Claim Type Selection | If multiple features are enabled for a product, the customer selects which type of claim they’re filing (Warranty, Exchange, or Return) |
Guest Claim Form & Shortcode
For customers who checked out as guests — or who simply don’t want to use My Account — ClaimPress provides the [claimpress_guest_form] shortcode that can be placed on any WordPress page. This creates a secure, multi-step claim submission portal:
- Order Lookup: Customer enters their Order ID and billing email address. ClaimPress validates the match against WooCommerce order records — only orders where the email matches the billing email are accessible.
- Product Selection: If the order is valid, ClaimPress displays all products in the order that have active ClaimPress policies still within their eligibility window. The customer selects the product they want to claim.
- Claim Type & Description: Customer selects the type of claim (Warranty, Exchange, or Return) and enters a description of their issue.
- Submission: The claim is submitted and a confirmation is shown. The guest receives an email confirmation with their claim details.
The guest claim portal uses a modern, card-based layout with interactive notices — redesigned in v3.1.2 for a premium user experience that matches the professionalism of the rest of the claims process. After submission, the form correctly scrolls back to the confirmation section (v3.1.6 fix) rather than jumping to the top of the page.
Security: The guest claim form validates orders using a strict Order ID + email match. Orders in ineligible statuses (anything other than “Completed” or configured eligible statuses) cannot be claimed, preventing fraudulent claims on undelivered or pending orders.
Setting Up the Guest Claims Portal
The guest claim form is a one-time setup requiring 5 steps:
- Create a new WordPress page (e.g., title: “File a Claim”)
- Add the shortcode
[claimpress_guest_form]to the page content - Publish the page
- Go to ClaimPress → Settings and select this page from the Guest Claim Page dropdown
- Save Changes
Optionally add the page to your navigation menu (Appearance → Menus) so customers can find it easily. ClaimPress Settings include step-by-step setup instructions and style notes for the guest claim page directly in the settings UI — no need to consult documentation.
Sequential Order Number Plugin Compatibility
Many WooCommerce stores use sequential order number plugins (WebToffee Sequential Order Numbers, SkyVerge, etc.) that replace WooCommerce’s default order IDs with formatted numbers like #10001, INV-2026-001, etc. Guest customers referencing their order confirmation email would see these custom numbers rather than the raw WordPress post ID.
ClaimPress v3.1.2 introduced a Fallback Lookup mechanism that ensures full compatibility with sequential order number plugins. When a guest enters a custom order number in the claim form, ClaimPress tries both the direct post ID lookup and a meta-based lookup for the custom sequential number — so customers using their custom invoice number will successfully find their order. The Claimable Products tab in My Account also correctly displays custom order numbers rather than raw database IDs (fixed in v3.1.1).
The Claim Submission Form
Whether accessed from My Account or the guest portal, the claim submission form collects:
- Claim type: Warranty, Exchange, or Return (shown only for types enabled on that product)
- Issue description: Free-text description of the problem or reason for the claim
- Fee Waiver request: Optional checkbox to request a fee waiver with reason (Pro)
- File attachments: Photo or PDF uploads for proof (Pro; optionally required by global setting or automatically required for waiver requests)
Customer Proof Attachments (Pro)
ClaimPress Pro adds a file attachment capability to the claim submission form, allowing or requiring customers to upload photos or documents with their claim. Three configuration modes:
- Optional: Customers may upload images/PDFs but are not required to
- Required (global): The “Mandatory Proof” setting globally blocks claim submission unless a file is uploaded — filtering out unsubstantiated or potentially fraudulent claims before they reach the admin
- Auto-required for fee waivers: When a customer checks “Request Fee Waiver,” the proof upload automatically becomes required — eliminating fee waiver requests without supporting evidence
Supported formats: JPG, PNG (photos), PDF (documents). Files uploaded with claims are stored securely and displayed in the admin claim detail view for review. The mandatory proof setting is a fraud reduction mechanism — requiring photo evidence of a defective or incorrectly shipped product filters out lazy or dishonest claims before any admin time is spent on them.
Frequently Asked Questions
Do I need to create a guest claim page or does it appear automatically?
The guest claim page requires a one-time setup: create a WordPress page, add the [claimpress_guest_form] shortcode, and select it in ClaimPress Settings. The My Account “Claimable Products” tab for logged-in customers appears automatically with no setup required.
Can customers track their claim status after submitting?
Logged-in customers can see their claim status in the “Claimable Products” My Account tab alongside the product that was claimed. Guest customers receive email notifications when their claim status changes (Pending, In Progress, Approved, Rejected, Completed) — each status shows a unique, accurate message so customers know exactly what’s happening with their claim.
Give Every Customer a Professional Claims Experience
ClaimPress’s dual claim system handles logged-in and guest customers with equal professionalism — no email chaos, just structured claims management.
